- Infrastructure
- Snowflake Setup Requirements (AWS)
Infrastructure
Snowflake Setup Requirements (AWS)
Setting up Snowflake as your offline store with AWS S3.
This guide covers setting up Snowflake as your offline store for AWS deployments using S3 storage integration. The steps below guide you through the necessary Snowflake database setup and configuring the offline store connection.
For architecture overview, component hierarchy, and multi-environment planning, see Snowflake Offline Store Overview.
Architecture
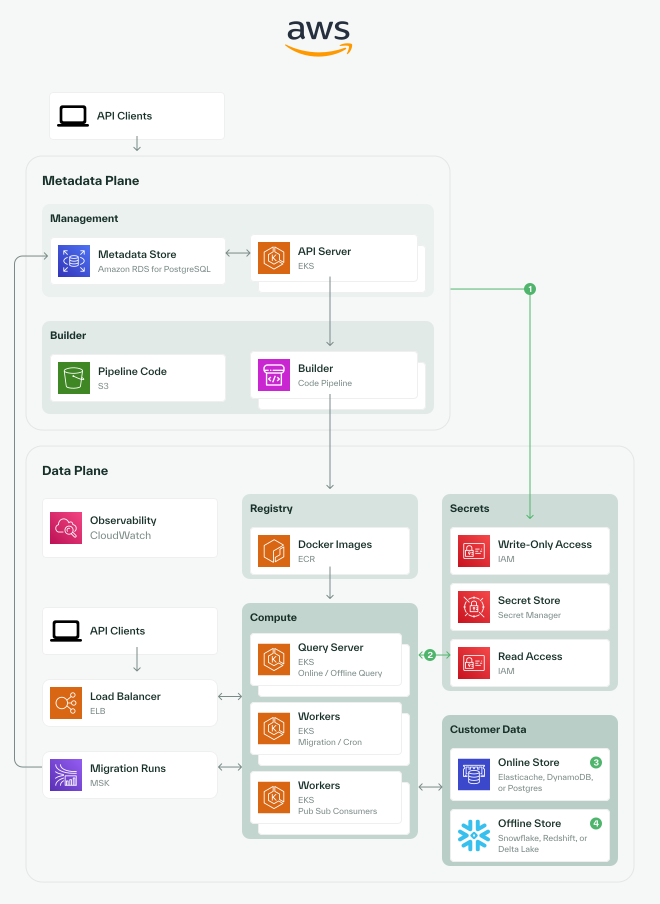
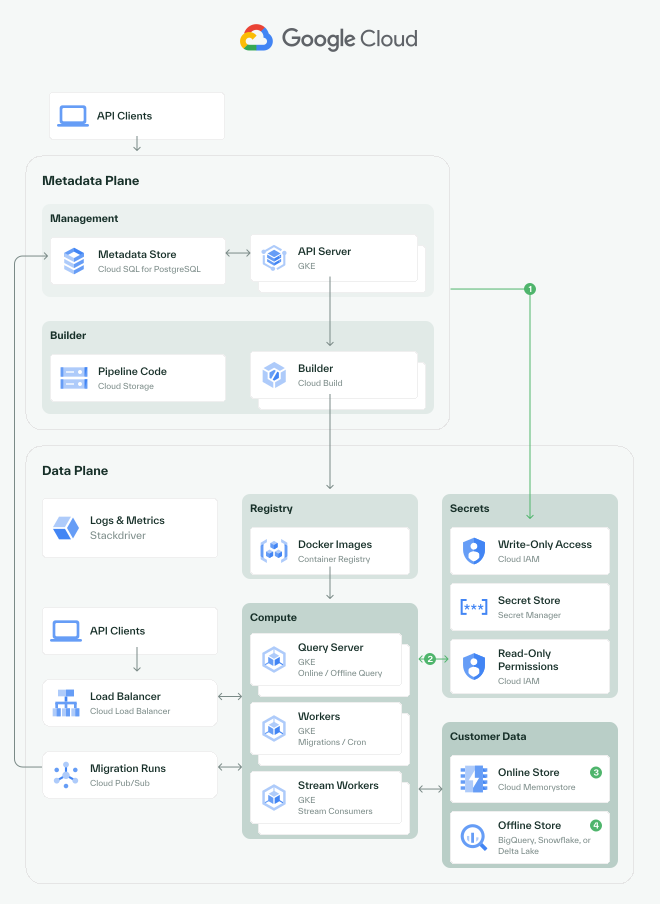
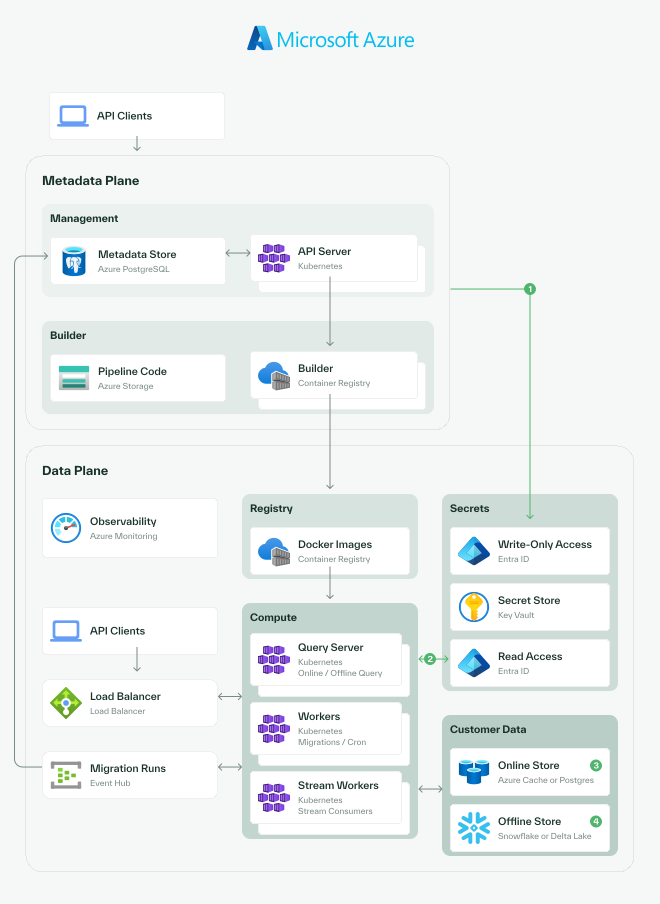
- 1Creating secrets:The API server can be configured to have write-only access to the secret store.
- 2Reading secrets:Secret access can be restricted entirely to the data plane.
- 3Online store:Chalk supports several online feature stores, which are used for caching feature values. On AWS, Chalk supports DynamoDB and Elasticache.
Database Setup
To use Snowflake as your offline store, you need a warehouse, database, schema, and a user with a role whose access is scoped to the offline-store schema. Chalk does not need ownership of the database or schema. See Required Snowflake Permissions for the complete privilege model, including shared-user and existing-store setups.
Step 0: Generate Key Pair
Generate a private key in PKCS#8 format without encryption. Other key formats are not currently supported.
openssl genrsa 2048 | openssl pkcs8 -topk8 -inform PEM -out rsa_key.p8 -nocryptThen generate the corresponding public key:
openssl rsa -in rsa_key.p8 -pubout -out rsa_key.pubFor more details, see the Snowflake key-pair authentication guide.
Step 1: Create Database Objects
Run the following commands in SnowSQL, replacing the variables at the top.
For multi-environment deployments, see the annotations and the Additional Environments section below.
-- ═══════════════════════════════════════════════════════════════
-- CLUSTER-LEVEL RESOURCES (can be shared or separated per env)
-- These CAN be shared across environments, or you can create
-- separate databases/warehouses per environment if desired
-- ═══════════════════════════════════════════════════════════════
SET WAREHOUSE_NAME='CHALK_WAREHOUSE';    -- Can share across envs OR use CHALK_WAREHOUSE_DEV, etc.
SET WAREHOUSE_SIZE='XSMALL';
SET DB_NAME='CHALK';                     -- Can share across envs OR use CHALK_DEV, etc.

-- ═══════════════════════════════════════════════════════════════
-- ENVIRONMENT-LEVEL RESOURCES (unique per environment)
-- For multi-env deployments, use suffixes that fit your use case
-- Examples: _DEV, _STAGE, _PROD, _UAT, _SANDBOX, _TEAM1, etc.
-- ═══════════════════════════════════════════════════════════════
SET SCHEMA_NAME='OFFLINE_STORE';          -- ⚠️ MUST be unique per env
SET ROLE_NAME='CHALK_ROLE';               -- Recommended: unique per env
SET USER_NAME='CHALK_USER';               -- Recommended: unique per env

-- Create the database + schema + warehouse
CREATE DATABASE IF NOT EXISTS IDENTIFIER($DB_NAME);
USE DATABASE IDENTIFIER($DB_NAME);
CREATE SCHEMA IF NOT EXISTS IDENTIFIER($SCHEMA_NAME);
CREATE WAREHOUSE IF NOT EXISTS IDENTIFIER($WAREHOUSE_NAME) WITH WAREHOUSE_SIZE=$WAREHOUSE_SIZE;

-- Create a role for Chalk and grant the minimum offline-store privileges
CREATE ROLE IF NOT EXISTS IDENTIFIER($ROLE_NAME);
SET QUALIFIED_SCHEMA_NAME=concat($DB_NAME, '.', $SCHEMA_NAME);
GRANT USAGE ON WAREHOUSE IDENTIFIER($WAREHOUSE_NAME) TO ROLE IDENTIFIER($ROLE_NAME);
GRANT USAGE ON DATABASE IDENTIFIER($DB_NAME) TO ROLE IDENTIFIER($ROLE_NAME);
GRANT USAGE ON SCHEMA IDENTIFIER($QUALIFIED_SCHEMA_NAME) TO ROLE IDENTIFIER($ROLE_NAME);
GRANT CREATE TABLE, CREATE FUNCTION ON SCHEMA IDENTIFIER($QUALIFIED_SCHEMA_NAME) TO ROLE IDENTIFIER($ROLE_NAME);

-- Create a user for Chalk
CREATE USER IF NOT EXISTS IDENTIFIER($USER_NAME)
    RSA_PUBLIC_KEY=`<your-public-key-here-without-BEGIN/END-lines>`
    DEFAULT_ROLE=IDENTIFIER($ROLE_NAME)
    DEFAULT_WAREHOUSE=IDENTIFIER($WAREHOUSE_NAME)
    DEFAULT_NAMESPACE=IDENTIFIER(concat($DB_NAME, '.', $SCHEMA_NAME));

-- Grant the Chalk role to the Chalk user
GRANT ROLE IDENTIFIER($ROLE_NAME) TO USER IDENTIFIER($USER_NAME);What to Share with Chalk
Share the following securely via GPG encryption:
- The
USER_NAMEand RSA private key - The
WAREHOUSE_NAME,DB_NAME,SCHEMA_NAME, andROLE_NAME - Your Snowflake account name (
SELECT CURRENT_ACCOUNT_NAME();) - Your Snowflake organization name (
SELECT CURRENT_ORGANIZATION_NAME();)
Storage Integration Setup
Shared or Per-Environment: A storage integration can be shared by all environments in the cluster, or you can create a separate integration per environment for stricter isolation or separate cloud credentials. Either way, Chalk routes data using fully-qualified paths to ensure isolation between environments.
The storage integration creates an IAM entity with allowed storage locations, enabling Chalk to securely load and unload data from the offline store.
Required Information
Before setting up the storage integration, gather the following:
- AWS Account ID: The AWS account where your Chalk environment is deployed
- S3 Bucket Name: Typically
chalk-{organization}-data-bucket(confirm with Chalk if different) - Snowflake Role Name: The role name created in Database Setup (e.g.,
CHALK_ROLE)
Permissions required:
- AWS: Permissions to create IAM policies, roles, and update trust relationships
- Snowflake:
ACCOUNTADMINrole or equivalent permissions forCREATE INTEGRATION
Step 1: Create AWS IAM Policy
This policy grants Snowflake the minimum permissions needed to read and write objects to your S3 bucket.
Follow the Snowflake IAM Policy documentation to create a policy named chalk-{organization}-offline-store-access-policy that allows S3 object operations and bucket listing for your Chalk bucket.
Step 2: Create AWS IAM Role
This role will be assumed by Snowflake to access the S3 bucket.
Follow the Snowflake IAM Role documentation to create a role named chalk-{organization}-offline-store-access-role.
Important: When setting the trust policy, use a temporary placeholder with your AWS account ID and external ID "0000". You will update this with actual Snowflake credentials in Step 4.
Attach the IAM policy created in Step 1 to this role.
Step 3: Create Snowflake Storage Integration
This creates the storage integration object in Snowflake that links to the AWS role and S3 bucket.
Follow the Snowflake Storage Integration Setup documentation and execute the following SQL commands (replace placeholders with actual values):
-- Create the storage integration pointing to your AWS S3 bucket and IAM role
CREATE STORAGE INTEGRATION "s3-integration-chalk-{organization}-data-bucket"
TYPE = EXTERNAL_STAGE
STORAGE_PROVIDER='s3'
STORAGE_AWS_ROLE_ARN = 'arn:aws:iam::<your-aws-account-id>:role/chalk-{organization}-offline-store-access-role'
ENABLED = true
STORAGE_ALLOWED_LOCATIONS = ('s3://chalk-{organization}-data-bucket/');

-- Grant usage permissions to the Chalk role
GRANT USAGE ON INTEGRATION "s3-integration-chalk-{organization}-data-bucket" TO ROLE "CHALK_ROLE";

-- Verify the integration was created successfully and retrieve Snowflake credentials
DESCRIBE INTEGRATION "s3-integration-chalk-{organization}-data-bucket";
From the DESCRIBE INTEGRATION output, record the following values:
STORAGE_AWS_IAM_USER_ARNSTORAGE_AWS_EXTERNAL_ID
Use these values for Step 4.
Step 4: Update IAM Role Trust Policy
This step completes the trust relationship between Snowflake and AWS by updating the IAM role’s trust policy with the actual Snowflake credentials from Step 3.
Follow the Snowflake trust policy documentation to update the trust policy for the role chalk-{organization}-offline-store-access-role.
Replace the placeholder values with the actual values from Step 3’s DESCRIBE INTEGRATION output:
- Replace the Principal’s AWS ARN with
STORAGE_AWS_IAM_USER_ARN - Replace the External ID with
STORAGE_AWS_EXTERNAL_ID
Critical: Ensure you complete this step with the actual Snowflake credentials, not the placeholders. Snowflake cannot access the S3 bucket until this trust policy is properly configured.
Step 5: Test Storage Integration
Before proceeding, validate that your storage integration is properly configured using Snowflake’s built-in validation function.
Run the following SQL command to test all operations (read, write, list, delete):
-- Test the storage integration
SELECT SYSTEM$VALIDATE_STORAGE_INTEGRATION(
  's3-integration-chalk-{organization}-data-bucket',
  's3://chalk-{organization}-data-bucket/',
  'validation_test.txt',
  'all'
);
A successful result returns a JSON object with "status": "success" for each action.
For more details on this validation function, see the Snowflake documentation.
Additional Environments
If you have multiple Chalk environments (e.g., dev, staging, production) in the same cluster, follow these steps for each additional environment.
What to Reuse (Cluster-Level)
Running multiple clusters? This section assumes every environment listed here is in the same cluster and the same AWS account. If you run separate clusters in separate AWS accounts (for example, regionally-separated US and EU deployments), each account needs its own S3 bucket — see Multi-Account Deployments on the Overview page.
These resources are already created and must be shared across all environments in this cluster:
- S3 Bucket
These resources can be shared or separated per environment (your choice):
- Storage Integration: reuse the one created above, or create a separate integration per environment for stricter isolation.
- IAM Policy and Role: a shared integration reuses the existing IAM role; a per-environment integration needs its own.
- Database: share one database, or create
CHALK_DEV,CHALK_STAGE,CHALK_PROD. - Warehouse: share one warehouse, or create separate warehouses per environment for independent scaling/billing.
What to Create New (Per Environment)
For each additional environment, create:
- New Schema (required: must be unique per environment)
- New Role (recommended)
- New User with new key pair (recommended)
SQL for Additional Environment
-- ═══════════════════════════════════════════════════════════════
-- ADDITIONAL ENVIRONMENT SETUP
-- Replace _STAGE with your environment suffix
-- Use suffixes that fit your use case: _DEV, _PROD, _UAT, _SANDBOX, etc.
-- ═══════════════════════════════════════════════════════════════

-- Database and Warehouse: share existing OR create new per environment
-- Option A: Share (simpler)
SET DB_NAME='CHALK';                      -- Same database (shared)
SET WAREHOUSE_NAME='CHALK_WAREHOUSE';     -- Same warehouse (shared)
-- Option B: Separate (for independent scaling/billing)
-- SET DB_NAME='CHALK_STAGE';             -- Separate database per env
-- SET WAREHOUSE_NAME='CHALK_WH_STAGE';   -- Separate warehouse per env

-- New environment-specific resources
SET SCHEMA_NAME='OFFLINE_STORE_STAGE';    -- ⚠️ MUST be unique
SET ROLE_NAME='CHALK_ROLE_STAGE';
SET USER_NAME='CHALK_USER_STAGE';

-- Create the new schema
USE DATABASE IDENTIFIER($DB_NAME);
CREATE SCHEMA IF NOT EXISTS IDENTIFIER($SCHEMA_NAME);

-- Create a new role for this environment
CREATE ROLE IF NOT EXISTS IDENTIFIER($ROLE_NAME);
SET QUALIFIED_SCHEMA_NAME=concat($DB_NAME, '.', $SCHEMA_NAME);
GRANT USAGE ON WAREHOUSE IDENTIFIER($WAREHOUSE_NAME) TO ROLE IDENTIFIER($ROLE_NAME);
GRANT USAGE ON DATABASE IDENTIFIER($DB_NAME) TO ROLE IDENTIFIER($ROLE_NAME);
GRANT USAGE ON SCHEMA IDENTIFIER($QUALIFIED_SCHEMA_NAME) TO ROLE IDENTIFIER($ROLE_NAME);
GRANT CREATE TABLE, CREATE FUNCTION ON SCHEMA IDENTIFIER($QUALIFIED_SCHEMA_NAME) TO ROLE IDENTIFIER($ROLE_NAME);

-- Create a new user for this environment
CREATE USER IF NOT EXISTS IDENTIFIER($USER_NAME)
    RSA_PUBLIC_KEY=`<your-new-public-key-here>`
    DEFAULT_ROLE=IDENTIFIER($ROLE_NAME)
    DEFAULT_WAREHOUSE=IDENTIFIER($WAREHOUSE_NAME)
    DEFAULT_NAMESPACE=IDENTIFIER(concat($DB_NAME, '.', $SCHEMA_NAME));

GRANT ROLE IDENTIFIER($ROLE_NAME) TO USER IDENTIFIER($USER_NAME);

-- Grant access to a storage integration: reuse the shared one (shown), or create a separate
-- integration for this environment following the Storage Integration Setup steps above
GRANT USAGE ON INTEGRATION "s3-integration-chalk-{organization}-data-bucket" TO ROLE IDENTIFIER($ROLE_NAME);Example Multi-Environment Naming
Note: The suffixes below (
_DEV,_STAGE,_PROD) are examples. Use suffixes that fit your use case. Other common patterns include_UAT,_SANDBOX,_QA,_TEAM1, or environment-specific identifiers.
Must be unique per environment:
| Resource | Dev | Stage | Prod |
|---|---|---|---|
| Schema | OFFLINE_STORE_DEV | OFFLINE_STORE_STAGE | OFFLINE_STORE_PROD |
| Role | CHALK_ROLE_DEV | CHALK_ROLE_STAGE | CHALK_ROLE_PROD |
| User | CHALK_USER_DEV | CHALK_USER_STAGE | CHALK_USER_PROD |
Can be shared OR separated (your choice):
| Resource | Shared Option | Separated Option |
|---|---|---|
| Storage Integration | s3-integration-chalk-{organization}-data-bucket for all envs | One integration per environment |
| Database | CHALK for all envs | CHALK_DEV, CHALK_STAGE, CHALK_PROD |
| Warehouse | CHALK_WAREHOUSE for all envs | CHALK_WH_DEV, CHALK_WH_STAGE, CHALK_WH_PROD |
| IAM Policy/Role | One role backing a shared integration | A separate role per per-environment integration |
Must be shared (per AWS account, not per cluster):
| Resource | All Environments in This AWS Account |
|---|---|
| S3 Bucket | chalk-{organization}-data-bucket |
If you run multiple clusters in separate AWS accounts, each account needs its own bucket — see Multi-Account Deployments.
Offline Store Connection Setup
You can configure your offline store connection either through the dashboard under Integrations > Offline Store
or programmatically via the Chalk CLI tool.
To configure the connection programmatically via the Chalk CLI tool, there are the following prerequisites:
- Chalk Platform version must be v3.31.22 or higher.
- Chalk CLI version must be v1.39.8 or higher.
- The Database Setup steps above must be completed.
- There must be offline writers deployed (you can do so in the dashboard under
Settings > Shared Resources).
To verify that your Chalk deployment and Chalk CLI tool meet the version requirements, run
chalk login in your Chalk repository, then run the following command in the CLI:
> chalk offline-store connection list

✓ Fetched offline store connections
No offline store connections found.
If you run that command and see errors, it is likely that one of your platform or CLI version is below the requisite version.
Configuration Steps
1. Create the offline store connection
There are two modes for the create command below: guided prompts and YAML. If you run the command below without any flags, this will guide you through guided prompts.
chalk offline-store connection create
To pass in a YAML file with the configuration, you can instead use the -f flag.
chalk offline-store connection create -f path/to/your/config.yaml
For authentication, you can choose to pass in either password or private_key. Private key is
required for all Snowflake accounts with MFA.
name: A_NAME
config:
  snowflake:
    credentials:
      account: gukdghb-chalk_aws_us_east_1
      username: A_USER
      database: A_DB
      schema: A_SCHEMA
      warehouse: A_WH
      role: A_ROLE
      private_key: |
        -----BEGIN PRIVATE KEY-----
        ...
        -----END PRIVATE KEY-----
This command will store the configuration details.
2. List connections to get the connection ID
Run the following command, and copy the connection ID for the connection you just created. You will need this for the next step.
chalk offline-store connection list
3. Activate the offline store connection
Using the ID from the previous step, run the following command to run schema migrations against the offline store.
chalk offline-store connection activate <YOUR_CONNECTION_ID>This command will kick off the schema migrations asynchronously. These migrations can also be triggered
manually using the migrate command. Migrations may take up to a few minutes to run. This step will
also set a Cloud Secret ID that will get picked up by engines and writers. If feature_store_secret
was previously set in the environment, it must be unset for the connection to be activated successfully.
4. Verify the connection is active
After a few minutes, you can verify that the feature_store_secret has been set by running the
following command:
chalk environment config | grep -o 'feature_store_secret:"[^"]*"' | cut -d'"' -f25. Redeploy environment
After the feature_store_secret has been set, you can redeploy your environment (in the Chalk Dashboard,
in the Deployments tab, click Redeploy on the latest active deployment). Once pods roll, the offline
store connection will be active and your environment will be able to read/write from the offline store.
Troubleshooting and Notes
- There’s a deactivate command if you need to unset the active connection.
- Note that the storage integration settings for Snowflake in the CLI have no effect today. Use the offline writer configs set in the dashboard under
Settings > Shared Resources.