- Infrastructure
- Resource Configuration
Infrastructure
Resource Configuration
Configure your Chalk Kubernetes cluster
Overview
The Infrastructure page of the dashboard exposes many useful configurations that you can use to
tune your Chalk environments appropriately to handle your specific workload and latency requirements.
Kubernetes
Under Infrastructure > Kubernetes, you can view all the pods in your Kubernetes cluster under the namespace
for your environment, in addition to their phase and creation timestamp. By clicking on the pod name,
you can also view the Kubernetes Pod View. This will include data about the pod, such as the resource
request, IP address, and resource group, as well as data about the node on which the pod is scheduled.
In the Pod View, you can also see the logs for the pod, which can be useful for debugging errors on
branch deployments or job pods.
Nodepools
Under Infrastructure > Nodepools, you can view and configure the nodepools
used to run your Chalk environment. A NodePool defines constraints on the Kubernetes nodes that can be
scheduled in your Kubernetes cluster. Notably, you can select the machine families that you would like
to use in your deployment, as different machine families are optimized for different workloads. You can
also set a CPU limit on your NodePool. This page will allow you to provision the resources and machine
families that are best suited for your workload and usage requirements.
When configuring a nodepool, you’ll notice two checkboxes, “Isolate this nodepool” and “Restrict to Chalk workloads only”.
“Isolate this nodepool” being set means that workloads cannot
be scheduled in the nodepool unless they are specifically configured to do so under
Infrastructure > Resource Configuration, which can be useful to minimize interference or reserve certain instance
types for specific workloads. This causes the nodepool to have the Isolated label.
“Restrict to Chalk workloads only” being set means that unrelated non-Chalk workloads in the cluster
will not be allowed to schedule on this nodepool, which can be useful for environments deployed into pre-existing
clusters that also run unrelated workloads. This ensures that those non-Chalk workloads do not inadvertently consume
Chalk credits. This causes the nodepool to have the Restricted label.
You may also notice that the nodepools you create through the Chalk dashboard automatically have the Chalk label.
This indicates that the nodepool makes Chalk-managed nodes, whose uptime contributes to credit usage. All nodepools
created through the Chalk dashboard automatically have this label, although the dashboard will also display nodepools
without it. Chalk workloads are only allowed to schedule on nodes from nodepools with the Chalk label.
More details about these labels can be found in the Billing Documentation.
Once you have configured your Nodepools, under Infrastructure > Resource Configuration, you can select the Nodepool
to use for each service in each resource group in your environment, as well as the Pod Disruption
Budget.
Resources
Under Infrastructure > Resource Configuration, you will find the Cloud Resource Configuration page, which enables you
to set the default resource requests, autoscaling, and limits for each service in each resource group
in your Chalk environment.
All Chalk environments will have a Default resource group. If you have a specific use case which would
require more resource groups, please reach out to the Chalk Team.
In a resource group, you can specify the default resource requests, pod instances, instance types, and
nodepools for each service. The resource configurations for the Query Server, gRPC Query Server, and the
Branch Server will be used to spin up pods during deployments. The Job Queue Consumer configuration
specifies a pool of workers that are used to process asynchronous offline query jobs, scheduled queries,
and aggregation backfills. The worker pool will automatically scale up and down based on the number of jobs
in the queue to process. The resource requests for asynchronous offline queries can be overridden in the
resource_request parameter of the ChalkClient.offline_query() method, and the resource requests for
Scheduled Queries can be overridden in the dashboard in the Scheduled Query Configuration tab for the job.
In order to isolate resources for different services, you can select Isolate from other Chalk services,
which will ensure that pods for that service are only scheduled on nodes provisioned for that service.
For example, if you serve production traffic against your gRPC query servers, you can isolate the resources
such that Karpenter consolidation of other pods for offline jobs or the branch server will not affect
your gRPC query server pods. For resource optimization, the Instance Type selector enables you to specify
the machine family you would like to use for your
deployment. For example, this would map to EC2 Instance Types
for AWS deployments or Compute Engine Machine Families
for GCP deployments. By default, the Ephemeral Storage for a service will be set to the same as the
Memory, but if you are deploying larger files, you can specify the Ephemeral Storage separately.
How are Pods and Nodes Provisioned?
In the Infrastructure page of the dashboard, you can configure the nodepools and resource configurations that are
used in combination to provision resources in your cluster.
Whenever there is a new pod that needs to be spun up, triggered either by a manual trigger, cron schedule, or
autoscaling, then based on the Resource Configurations set for the service for the pod being spun up, we will
create a pod with resource requests, node selectors, affinities, and anti-affinities. The Kubernetes Scheduler
will then attempt to place the pod on an existing node. If it cannot find a node that satisfies the pod’s
configurations, then Karpenter will analyze the pod, as well as the other nodes in the cluster and provision
or deprovision nodes such that the new pod can be scheduled.
For AWS-hosted clusters, we use Karpenter Nodepools and for GCP-hosted clusters we use NAP. Both Karpenter and GKE NAP will attempt to optimize resource provisioning based on the provided nodepool constraints. You can manage these nodepool constraints in a few ways:
- Edit your existing nodepools: Under
Infrastructure > Nodepools, you can edit the nodepool constraints to restrict or widen the nodes that Karpenter can produce. - Create new nodepools: Under
Infrastructure > Nodepools, you can create new nodepools with more restrictive node constraints, marking them as “isolated” to prevent services from scheduling on them, and configure one or more services to run only on those nodepools. - Specify Nodes in Service Requests: Under
Infrastructure > Resource Configuration, you can make services request specific kinds of machines under theService Isolationpane.
While customers on GCP and AWS can both create nodepools through the Nodepools tab in the dashboard, the nodepools that you can create differ. Typically, you would define Karpenter nodepools to provision a range of nodes, whereas NAP in GCP would create nodepools in response to pods that need to be scheduled, where each nodepool can create exactly one kind of node that can scale by the number of node instances. Chalk enables customers to create nodepools regardless of cloud provider, however customers on GCP would have to choose between allowing NAP to make its own decisions about the types of nodes to provision or to define your own set of nodepools to force services to run on specific instance types.
When choosing how to constrain pod resource requests and nodepools, it is possible to request more resources than an instance type has available. The Chalk dashboard provides warnings when the resources requested are impossible to schedule on any available nodes, but it can be difficult to be estimate the amount of overhead on each Kubernetes node. Typically, selecting a resource request that aims for 75% of stated node capacity should be reasonable.
Autoscaling
Chalk supports autoscaling of resources in your environment in order to optimize resource usage.
For the branch server, you can set the Auto Shutdown Period, which will determine the duration of
inactivity (no queries or deploys) after which the branch server pod will be automatically shut down.
For the Query Server and gRPC Query Server which are used to serve your production traffic, you can configure KEDA-based autoscaling. Autoscaling for either of these resources will be constrained depending on the Nodepool configurations for your environment. Auto-scaling can be triggered based on CPU utilization or on a schedule.
CPU-Based Autoscaling
To enable CPU-based autoscaling, you can set the Target CPU % in the Cloud Resource Configuration.
Chalk will then monitor the CPU utilization of the service and scale the number of instances up or down
based on the target CPU percentage. In order for CPU-based autoscaling to work, you must have the
Min Instances, Max Instances, and Target CPU% all set for the service.
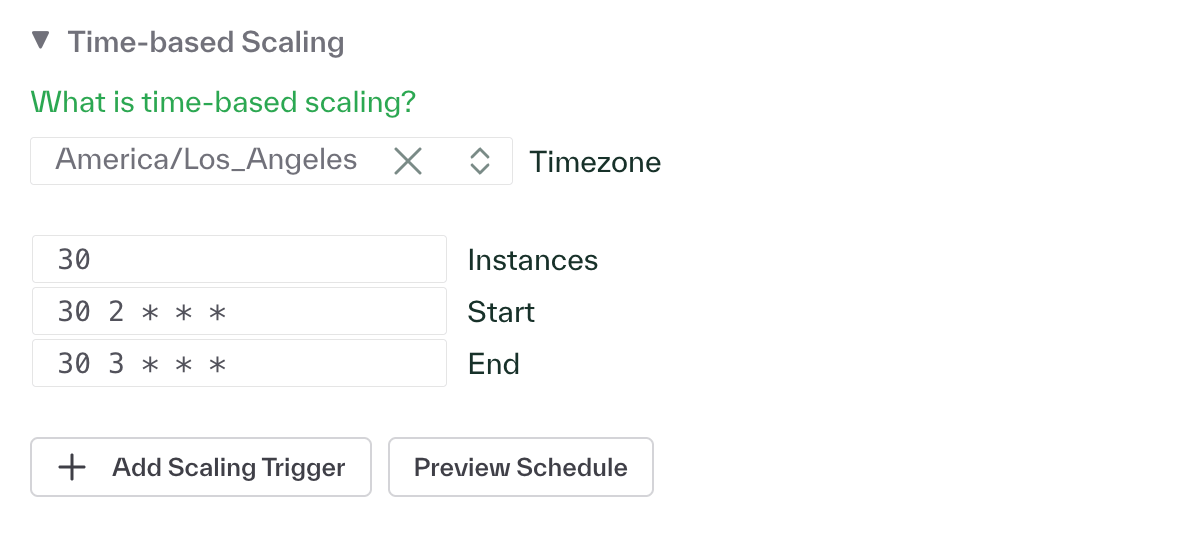
Scheduled Autoscaling
To enable scheduled autoscaling, you can define Scaling Trigger’s for each service configuration in the
Cloud Resource Configuration page. For each service in a resource group that you would like to autoscale,
define the Min Instances and Max Instances under Scaling. Then, under the ADVANCED section, under
Time-based Scaling, you can define one or more Scaling Triggers. For each Scaling Trigger, you can define
the desired number of replicas, the start time, the end time, and the timezone for the schedule. The start
time and end time are defined using standard cron syntax.
Programmatic management
The same resource-group settings exposed in Infrastructure > Resource Configuration can be
read and edited from the CLI. This is useful for codifying environment configuration in
source control, scripting per-environment changes (image bumps, replica counts, autoscaler
overrides), and applying targeted edits without leaving the terminal.
The full configuration lives on the environment record under spec_config_json. A typical
shape looks like:
{
  "id": "tm-abc123",
  "name": "production",
  "spec_config_json": {
    "services": {
      "engine-grpc": { "min_instances": 2, "max_instances": 10, "request": { "cpu": "4", "memory": "8Gi" } },
      "branch":      { "request": { "cpu": "2", "memory": "6Gi" } }
    },
    "resource_groups": [
      {
        "resource_group_name": "high-throughput",
        "services": {
          "engine-grpc": { "min_instances": 5, "engine_image_uri_override": "gcr.io/chalk/engine:sha-abc123" }
        }
      }
    ]
  }
}
The fields directly under spec_config_json (alongside resource_groups) make up the
default resource group. Each entry in resource_groups is a named override group
keyed by resource_group_name.
There are three CLI commands you’ll use:
| Command | What it does |
|---|---|
chalk environment config --json | Print the active environment, including spec_config_json, as JSON. |
chalk environment update | Replace whole top-level fields of an environment from a YAML file. |
chalk environment patch | Apply a targeted JSON-merge or RFC 6902 patch to a single resource group. |
environment is aliased to env, so chalk env config, chalk env update, and chalk env patch
all work.
Inspecting the current configuration
Use chalk environment config --json to dump the active environment. With --json the
command emits the full environment proto as JSON; without it you get a YAML rendering.
$ chalk environment config --json > env.json

# Inspect just the resource groups
$ chalk environment config --json | jq '.spec_config_json.resource_groups'

# Find a specific group
$ chalk environment config --json \
    | jq '.spec_config_json.resource_groups[] | select(.resource_group_name=="high-throughput")'

# Grab the environment id (needed by `chalk environment update`)
$ chalk environment config --json | jq -r '.id'
The active environment is determined by your CLI auth context — switch with chalk environment <name>
before running the command, or use --env-id to scope individual operations.
Bulk updates with chalk environment update
chalk environment update overwrites whole top-level fields on the environment from a YAML
config file. Use this when you want to replace the resource-group configuration wholesale
(for example, deploying a checked-in environment.yaml from a repo).
$ chalk environment update \
    --env-id env_abc123 \
    --config-file environment.yaml
The YAML file may contain any subset of the following keys; only keys that are present get sent in the update mask, so omitted keys are left untouched on the server:
| YAML key | Effect |
|---|---|
specs_config | Replaces the whole spec_config_json blob (resource groups, services, autoscalers, …). |
additional_env_vars | Replaces the environment-level env-var map. |
private_pip_repositories | Sets the private PyPI URL string. |
online_store_secret | Sets the secret name for the online store. |
feature_store_secret | Sets the secret name for the feature/offline store. |
A minimal environment.yaml that edits only resource groups looks like:
specs_config:
  services:
    engine-grpc:
      min_instances: 2
      max_instances: 10
      request:
        cpu: "4"
        memory: 8Gi
  resource_groups:
    - resource_group_name: high-throughput
      services:
        engine-grpc:
          min_instances: 5
          max_instances: 20
          engine_image_uri_override: gcr.io/chalk/engine:sha-abc123
specs_config is a wholesale replacement: anything you omit under it is removed. The
typical workflow is therefore “fetch → edit → apply”:
$ chalk environment config --json | jq '.spec_config_json' > spec.json
# edit spec.json (or convert to YAML and edit)
$ yq -P spec.json > environment.yaml   # wrap under `specs_config:` first
$ chalk environment update --env-id $(chalk environment config --json | jq -r .id) \
    --config-file environment.yaml
For per-field edits without round-tripping the whole config, prefer chalk environment patch.
Targeted patches with chalk environment patch
chalk environment patch applies a kubectl-style patch to a single resource group
within the active environment’s spec_config_json. The rest of the spec config is
preserved as-is, which makes it safe to script narrow changes (image bumps, replica
overrides, autoscaler tweaks) without touching unrelated services.
The command operates on the environment selected in your CLI auth context — there is no
--env-id flag. Switch with chalk environment <name> first if needed.
There are two input modes.
Sugar form: --service + --set
The fastest way to bump a single field on a single service inside a resource group:
$ chalk environment patch \
    --resource-group high-throughput \
    --service engine-grpc \
    --set engine_image_uri_override=gcr.io/chalk/engine:sha-abc123
Each --set key=value entry nests under services.<service> of the resource group.
You can pass --set multiple times. Values parse as JSON when they look like JSON
(true, 42, "quoted", [1,2,3]); otherwise they’re treated as strings. Dotted keys
build nested objects, so:
$ chalk environment patch \
    --resource-group high-throughput \
    --service engine-grpc \
    --set min_instances=5 \
    --set max_instances=20 \
    --set resources.requests.cpu=500m \
    --set resources.requests.memory=1Gi
is equivalent to a merge patch of:
{
  "services": {
    "engine-grpc": {
      "min_instances": 5,
      "max_instances": 20,
      "resources": { "requests": { "cpu": "500m", "memory": "1Gi" } }
    }
  }
}Raw form: --patch / --patch-file
For anything the sugar can’t express (multiple services in one shot, deletes, array
operations) supply a raw patch body. The --patch-type flag selects the format:
merge(default) — RFC 7396 JSON merge patch. Setting a field tonulldeletes it.json— RFC 6902 JSON patch (an array of{op, path, value}operations).
# Inline merge patch
$ chalk environment patch --resource-group high-throughput \
    --patch-type merge \
    --patch '{"services":{"engine-grpc":{"engine_image_uri_override":"gcr.io/chalk/engine:sha-abc123"}}}'

# Delete a field by setting it to null in a merge patch
$ chalk environment patch --resource-group high-throughput \
    --patch '{"services":{"engine-grpc":{"engine_image_uri_override":null}}}'

# RFC 6902 patch from a file
$ chalk environment patch --resource-group high-throughput \
    --patch-type json --patch-file replace-image.json

# Read the patch from stdin
$ jq -n '{services:{"engine-grpc":{min_instances:5}}}' \
    | chalk environment patch --resource-group high-throughput --patch-file -
Sugar (--service/--set) and raw (--patch/--patch-file) modes are mutually exclusive.
Patching the default resource group
The fields directly under spec_config_json (the ones that live alongside resource_groups)
are treated as the default resource group. Pass --resource-group default to patch
them:
$ chalk environment patch --resource-group default \
    --service branch \
    --set request.cpu=2 \
    --set request.memory=6Gi
Patches targeting default are not allowed to touch the resource_groups key — patch
each named group by name instead.
Previewing and confirming changes
Every patch prints a JSON diff of the resource group before vs. after, then prompts for
confirmation before applying. Use --dry-run to see the diff and exit without applying,
and --yes (or -y) to skip the prompt in scripts:
# Preview only
$ chalk environment patch --resource-group high-throughput \
    --service engine-grpc --set min_instances=5 --dry-run

# Apply non-interactively (CI)
$ chalk environment patch --resource-group high-throughput \
    --service engine-grpc --set min_instances=5 --yes
The patch fails fast if the named resource group doesn’t exist, if the patch body is
invalid JSON, if the merge would change resource_group_name, or if a default patch
would mutate resource_groups.
Shared Resources
Under Settings > Shared Resources, environment admins can view and manage shared resources across
different services in your environment, including the Metrics Database configuration, Gateway
configuration, and Background Persistence configurations. You can adjust these configurations here
if, for example, you need to scale up your Metrics Database to handle larger volumes of data, or
if you drastically increase the volume of data being written to the online or offline stores.
For enabling autoscaling of Background Persistence workers to handle variations in data being persisted online and offline, you can set the Horizontal Pod Autoscaling (HPA) Settings in the Background Persistence Configuration tab. In order to enable autoscaling, it is required to set
- Max replicas
- Min replicas
- Target average value (the approximate target undelivered message count in queue per replica)
- Pubsub Subscription ID
Connections
Under Settings > Connections, you can view all the connections that your environment has to external
resources, such as your online and offline stores, and the branch server. This is a good place to check
the health of the different services in your environment, as well as to verify the types of connections
configured.
Environment Variables
Under Integrations > Environment Variables, you can view and edit global environment variables for
your environment. Please reach out to the Chalk team if you have any questions about which environment variables
to set for your use case. Note that these are used for environment configuration, and any environment variables
that you would like to set for use in your resolvers should be set under Integrations > Secrets instead.
User Permissions and RBAC
Under Settings > Users & Roles, you can view the roles associated with each user, as well as whether those
roles are granted directly or via SCIM. When adding new users to your Chalk environment, you can assign
them roles that will determine their permissions in the environment. The available roles in order of
increasing permissions are:
- Viewer: Read the web portal and create new alerts.
- Data Scientist: Run queries, branch deploy, + everything that a Viewer can do.
- Developer: Run queries, run migrations + everything that a Data Scientist can do.
- Admin: Create deployments, service tokens, and secrets + everything that a Developer can do.
- Owner: Manage team members + everything that an Admin can do.
Customers with Enterprise Features can also configure datasource and feature-level RBAC (Role Based Access Control).
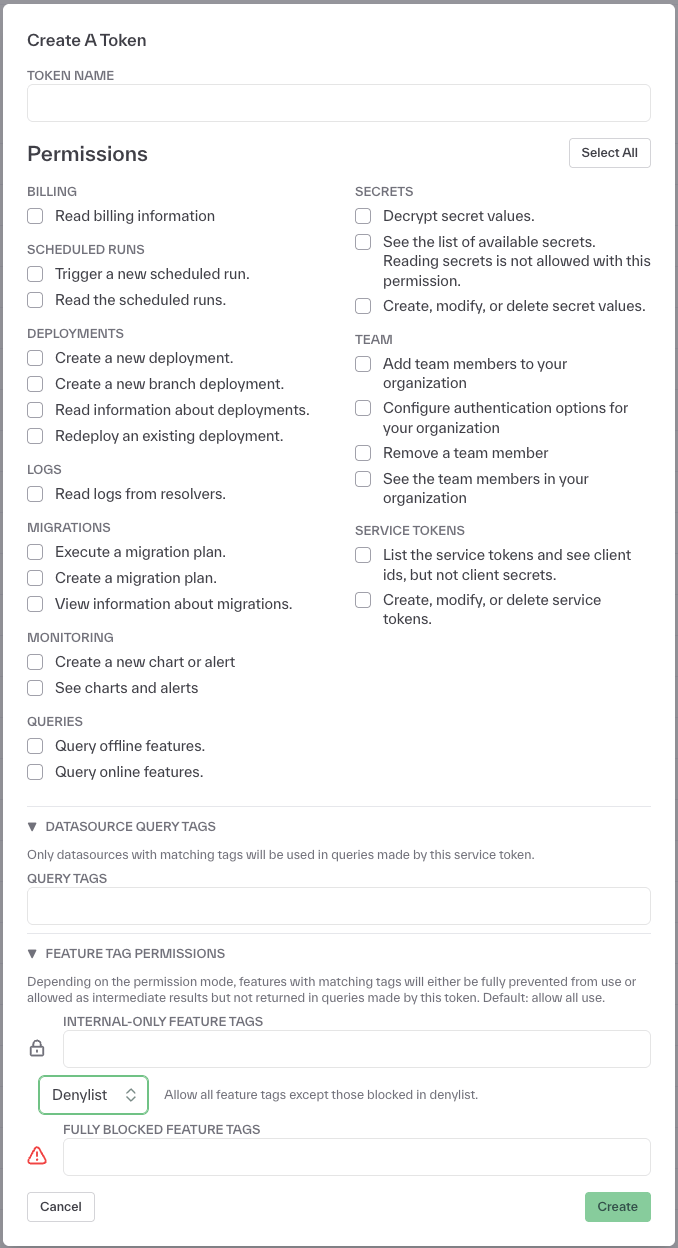
Under Settings > Access Tokens, you can create and manage service tokens that can be used for RBAC.
On the datasource level, you can restrict a token to only access data sources with matching tags to resolve features.
On the feature level, you can restrict a token’s access to tagged features either by
blocking the token from returning tagged features in any queries but allowing the feature values to be
used in the computation of other features, or by blocking the token from accessing tagged features entirely.
Denylisting vs Allowlisting Tags
When configuring feature-level RBAC, you can use either denylisting or allowlisting approaches to control access to tagged features:
Denylist: Users with a denylist configuration will be allowed to query all feature tags except those specifically blocked in the denylist. This is a permissive approach where access is granted by default, and only explicitly listed tags are restricted.
Allowlist: Users with an allowlist configuration will be denied access to query all feature tags except those specifically specified in the allowlist. This is a restrictive approach where access is denied by default, and only explicitly listed tags are permitted.